Schedule call
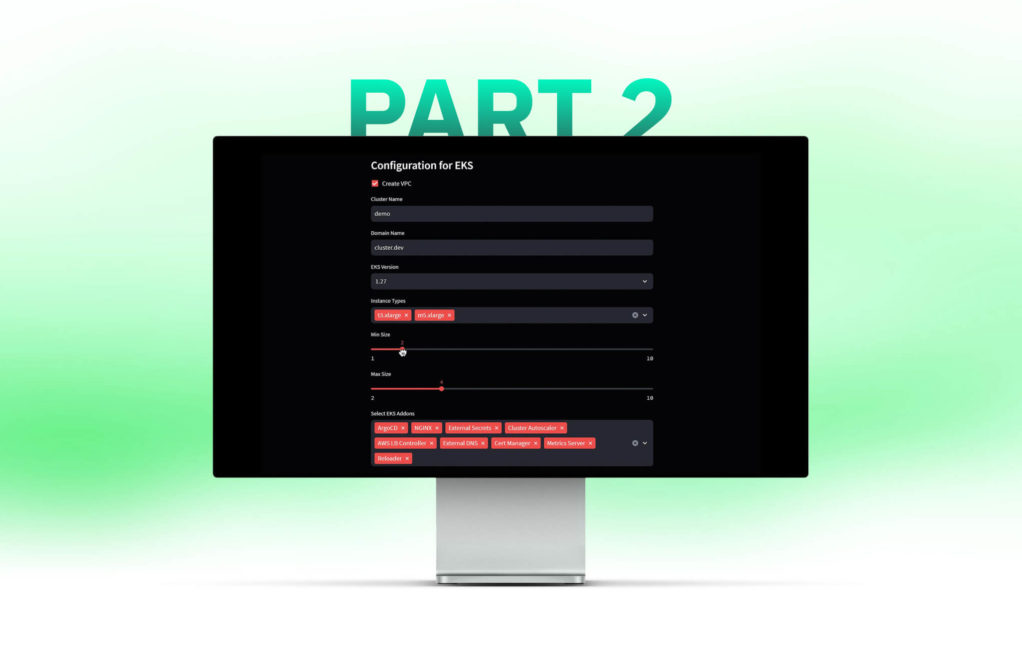
In the first part of this series we formalized the required workflow which you can find here. In this part, we want to build our UI for Cluster.dev using ChatGPT.
Visualize workflow using ChatGPT and Diagrams as Code
A hack I’ve recently started to use for the creation of any new project is to create a visualization of the process involved. For that, I’ve started to use ChatGPT and Mingrammer Diagrams. This is a cool resource which allows you to describe diagrams as a Python code and I’ve found it to be really useful – it may be of help to you too.
ChatGPT prompt to create Python code to visualize a project
ChatGPT provides me with the following code:
from diagrams import Diagram
from diagrams.c4 import Person, Container, Database, System, Relationship

# Graph and Node attributes for customization
graph_attr = {
    "splines": "ortho",  # Orthogonal edges for vertical alignment
    "rankdir": "TB",    # Top to Bottom direction
    "fontsize": "16",
    "bgcolor": "black",
    "fontcolor": "white"
}

with Diagram("Cluster Configuration and Deployment", show=False, graph_attr=graph_attr, node_attr=node_attr):
    user = Person("User", "End-users customizing their cluster through the UI")

    # Containers
    ui_selection = Container("UI Selection", "Select node size, region, domain, addons, etc.")
    repo_credentials = Container("Repository & Credentials", "Specify repository and provide AWS credentials")
    secure_aws_credentials = Container("Secure AWS Credentials", "Store AWS credentials in GitHub's secret storage")
    dynamic_yaml_generation = Container("Dynamic YAML Generation", "Generate YAML files based on user input")
    initiate_pr = Container("Initiate Pull Request", "Create PR and trigger Plan step")
    review_merge = Container("Review & Merge", "Review PR details and merge to execute cdev apply")

    # Database
    github_secret_storage = Database("GitHub Secret Storage", "Store AWS credentials securely")
    repository = Database("Repository", "Store YAML and workflow files, initiate PRs")

    # Systems
    github = System("GitHub", "Manage workflow, PRs, and secret storage")
    aws = System("AWS", "Cloud provider for Kubernetes cluster")
    terraform_helm = System("Cluster.dev", "Tools for bootstrapping the cluster")

    # Relationships
    user >> ui_selection
    ui_selection >> repo_credentials
    repo_credentials >> secure_aws_credentials
    secure_aws_credentials >> dynamic_yaml_generation
    dynamic_yaml_generation >> initiate_pr
    initiate_pr >> review_merge
    review_merge >> terraform_helm >> aws
    secure_aws_credentials >> github_secret_storage
    dynamic_yaml_generation >> repository
This is how it looks when shown as a graph:
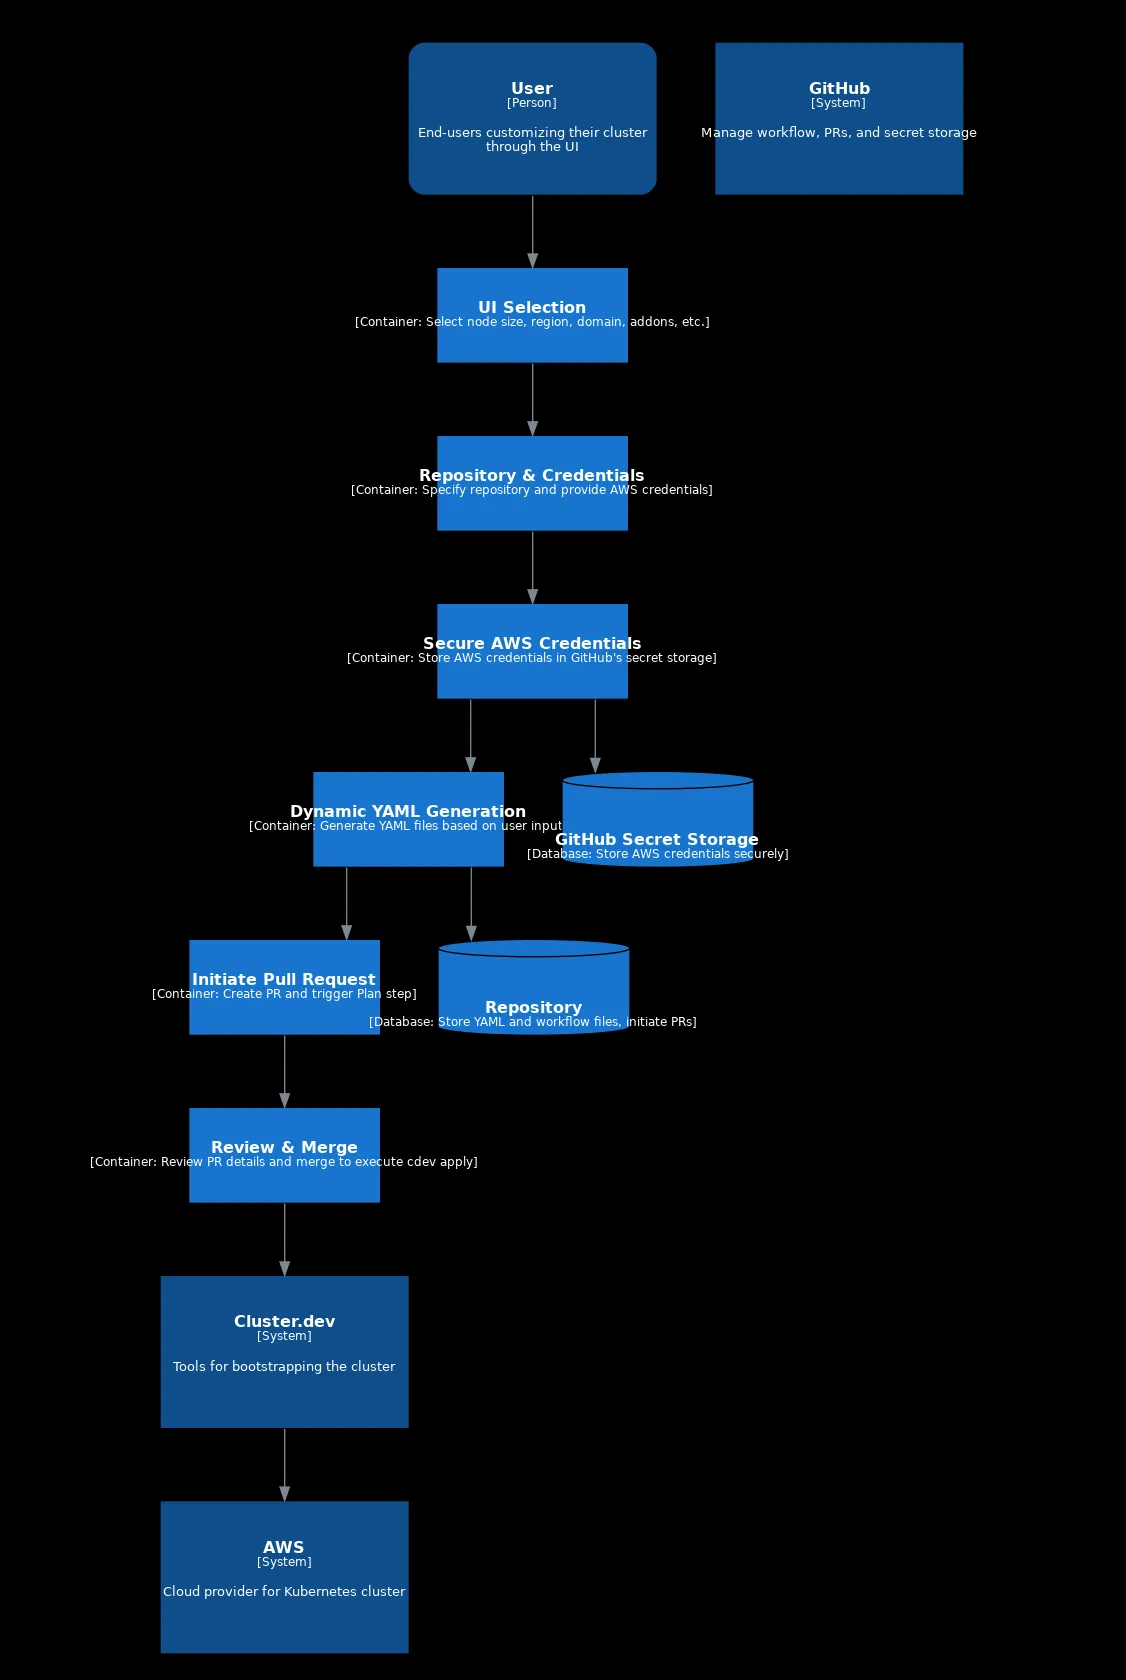
Flow Diagram generated as a code by ChatGPT
Ok, so it’s not perfect, but we can tidy it up manually if needed. More importantly, we have a helpful visual representation to keep in mind the process to codify and map to UI.
Building our first Streamlit app
To install Streamlit you need Python (for this article I’m using version 3.10.12) and use the following command: pip install streamlit.
So let’s create our first Streamlit app to generate a Cluster.dev project.yaml
import streamlit as st
import yaml

def generate_project_yaml():

    regions = [
        "us-east-1", "us-east-2", "us-west-1", "us-west-2",
        "af-south-1", "ap-east-1", "ap-south-1", "ap-northeast-1",
        "ap-northeast-2", "ap-northeast-3", "ap-southeast-1", "ap-southeast-2",
        "ca-central-1", "eu-central-1", "eu-west-1", "eu-west-2",
        "eu-west-3", "eu-north-1", "eu-south-1", "me-south-1",
        "sa-east-1"
    ]

    project_yaml = {
        "name":  st.text_input("Name", "my-project"),
        "kind": "Project",
        "backend": "aws-backend",
        "variables": {
            "organization": st.text_input("Organization", "my-company"),
            "region": st.selectbox("Region", regions, index=regions.index("eu-central-1")),
            "state_bucket_name": st.text_input("State Bucket Name", "cdev-state"),
        },
    }
    return yaml.dump(project_yaml)

project_yaml_content = generate_project_yaml()
st.subheader("Project YAML")
st.code(project_yaml_content, language="yaml")
To start and to run our app simply launch the Python file:
streamlit run cdev-ui.py

  You can now view your Streamlit app in your browser.

  Network URL: http://127.0.0.1:8501
  External URL: http://127.0.0.1:8501
When opening the browser link, what you’ll see is the following UI with selections. If you change any values, the code block with resulting yaml will be updated:
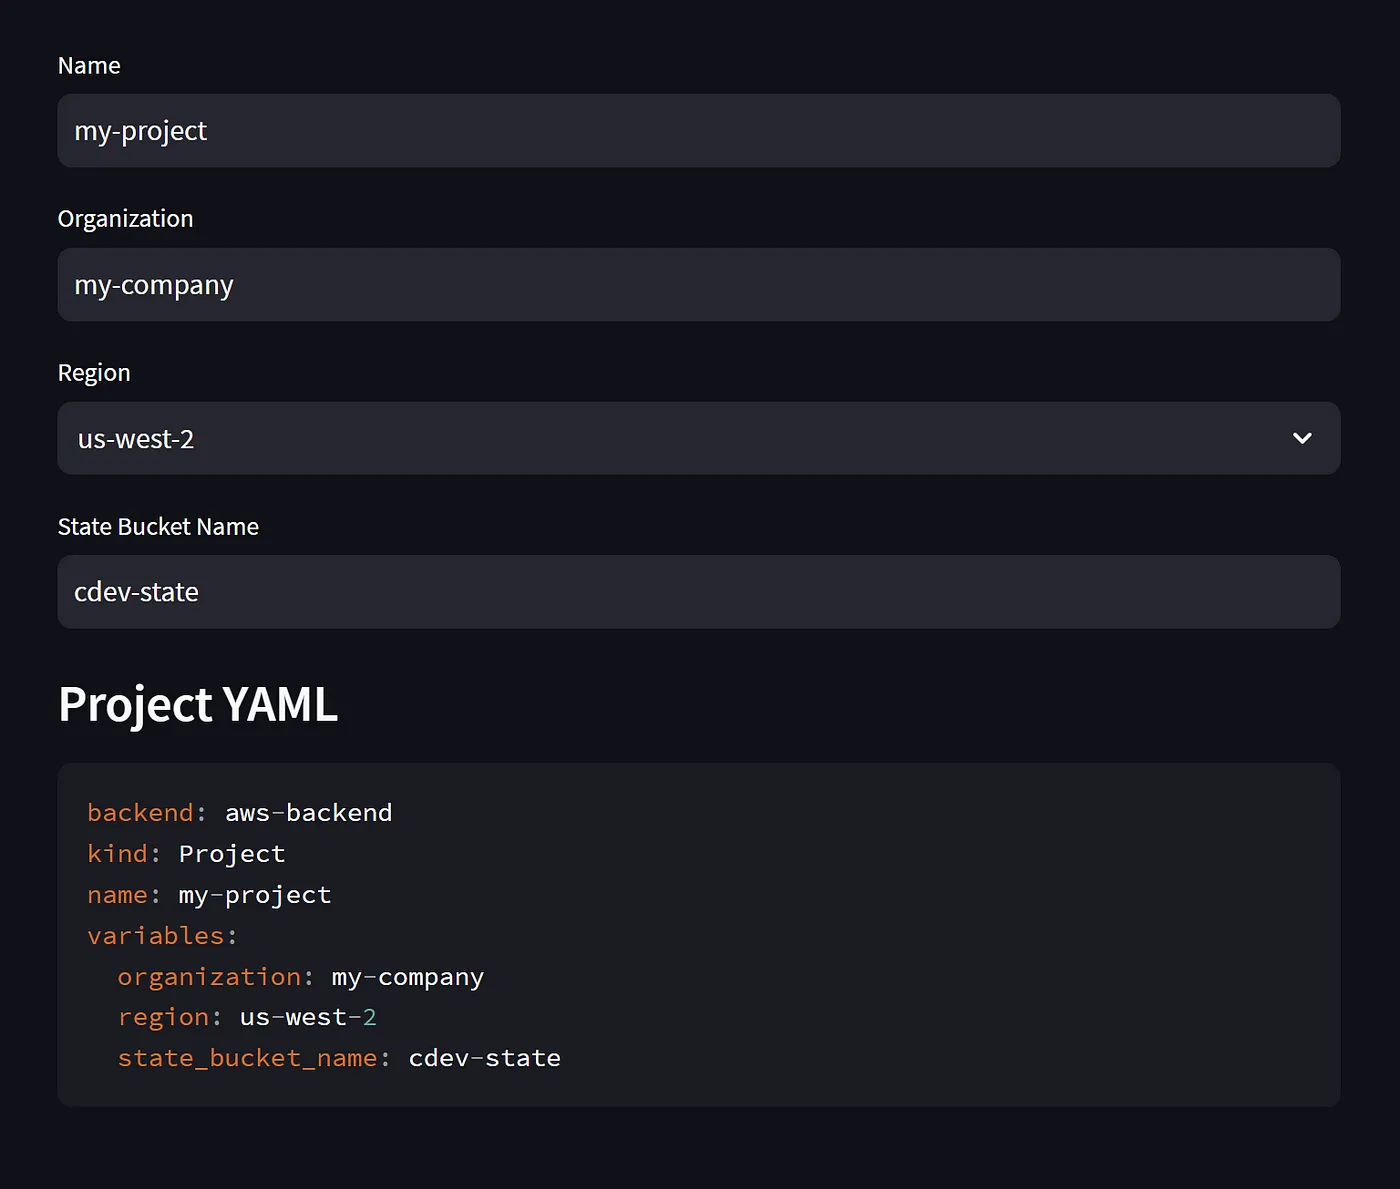
Generating YAML with Streamlit code
These are the Streamlit components used in this example:
st.text_input for Name, Organization and State Bucket name,
st.select box for Region selection with pre-populated list,
and st.code to display the resulting YAML.
With minimal effort and just a few lines of code we’ve been able to quickly build our own UI.
Advanced example of building UI
Now that we’ve completed a basic build, let’s move on to a more advanced example. For this, we’ll generate a Cluster.dev stack.yaml
Some values we need to extract from the project.yaml generated will be used to create a function generate_stack_eks_yaml(project_yaml).
First though, we need to look at the ways that this could potentially be done. To do so, let’s examine an example stack yaml:
name: cluster
template: "https://github.com/shalb/cdev-aws-eks?ref=main"
kind: Stack
backend: aws-backend
cliVersion: ">= 0.7.14"
variables:
  region: {{ .project.variables.region }}
  organization: {{ .project.variables.organization }}
  cluster_name: demo
  domain: cluster.dev
  eks_version: "1.27"
  environment: "demo-env"
  eks_addons:
    enable_argocd: true
    enable_nginx: true
    enable_external_secrets: true
    enable_cluster_autoscaler: true
    enable_aws_lb_controller: true
    enable_external_dns: true
    enable_cert_manager: true
    enable_efs: false
    enable_cert_manager_http_issuers: true
    enable_metrics_server: true
    enable_reloader: true
  eks_managed_node_groups:
    workers:
      capacity_type: SPOT
      desired_size: 2
      disk_size: 80
      force_update_version: true
      instance_types:
        - "t3.xlarge"
        - "t3a.xlarge"
        - "m5.xlarge"
      labels: {}
      max_size: 3
      min_size: 2
      name: spot-workers
      subnet_ids: {{ remoteState "cluster.vpc.private_subnets" }}
      taints: []
      update_config:
        max_unavailable: 1
      iam_role_additional_policies:
        ebspolicy: "arn:aws:iam::aws:policy/service-role/AmazonEBSCSIDriverPolicy"
Where we have static values like the template, inheritable properties, dynamic blocks for addons (eks_addons:) that could have multiple values, and the configuration for the node group (eks_managed_node_groups:) then it’s all pretty complex and could host different parameters like min/desired/max size. For spot instances there could be plenty of instance types and you may also want to allow users to attach some policies to the node groups, etc.
Deco Agency
The upshot is that building a UI for all of this looks as though it’s going to take quite a bit of time. I’ve turned to ChatGPT again to assist and asked it to generate a Streamlit Python code that would cover generating Cluster.dev stack.yaml:
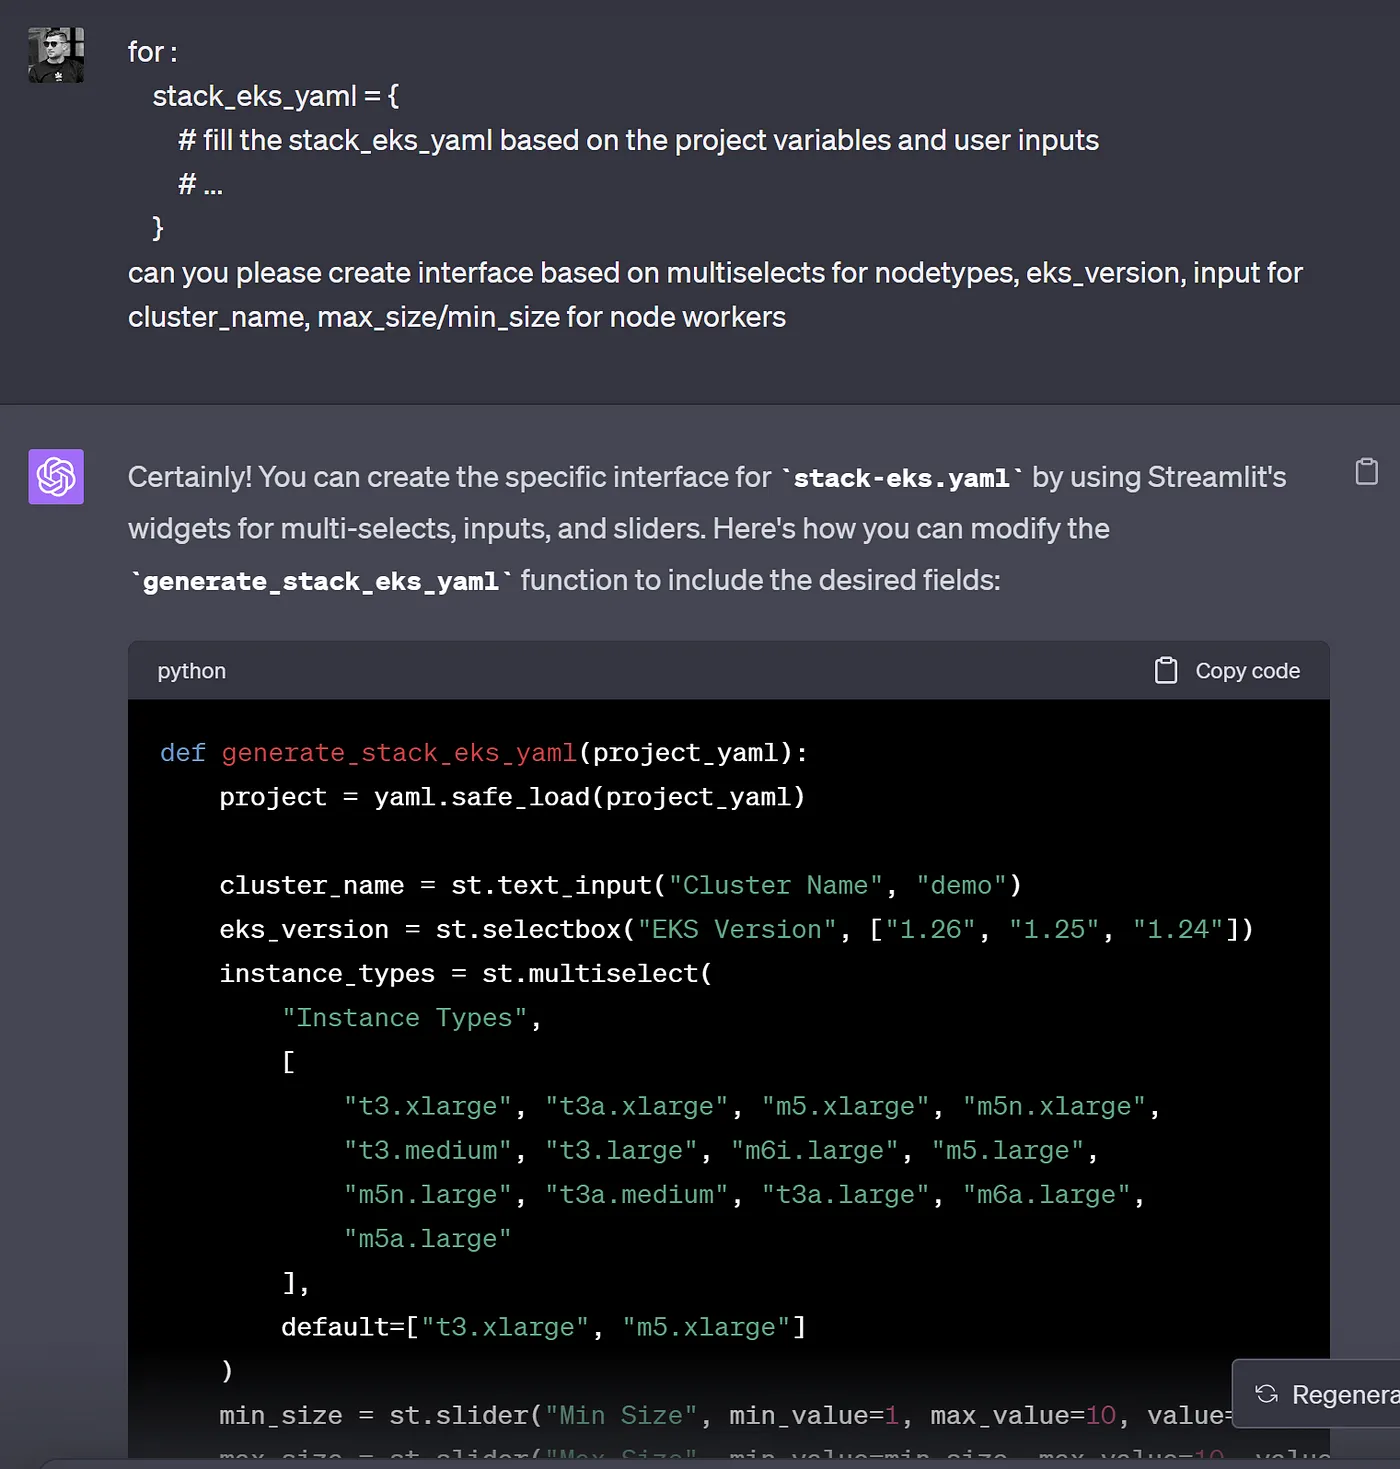
ChatGPT prompt to build a Streamlit UI for cluster.dev stack
The result is that after looking at Cluster.dev documentation and example stack configuration, ChatGPT has given me a fully working code I could use in my UI. Of course, I’d need to look at it properly to make sure I was happy with everything, but the time it took is incredible.
The resulting function looks like this:
def generate_stack_eks_yaml(project_yaml):
    st.subheader("Configuration for EKS")

    project = yaml.safe_load(project_yaml)

    create_vpc = st.checkbox("Create VPC", value=True)

    vpc_config = None
    if not create_vpc:
        vpc_id = st.text_input("VPC ID")
        public_subnets = st.text_area("Public Subnets (comma-separated)").split(",")
        private_subnets = st.text_area("Private Subnets (comma-separated)").split(",")
        database_subnets = st.text_area("Database Subnets (comma-separated)").split(",")
        vpc_config = {
            "vpc_id": vpc_id,
            "public_subnets": public_subnets,
            "private_subnets": private_subnets,
            "database_subnets": database_subnets,
        }

    cluster_name = st.text_input("Cluster Name", "demo")
    domain = st.text_input("Domain Name", "cluster.dev")

    eks_version = st.selectbox("EKS Version", ["1.27", "1.26", "1.25"])
    instance_types = st.multiselect(
        "Instance Types",
        [
            "t3.xlarge", "t3a.xlarge", "m5.xlarge", "m5n.xlarge",
            "t3.medium", "t3.large", "m6i.large", "m5.large",
            "m5n.large", "t3a.medium", "t3a.large", "m6a.large",
            "m5a.large"
        ],
        default=["t3.xlarge", "m5.xlarge"]
    )
    min_size = st.slider("Min Size", min_value=1, max_value=10, value=2)
    max_size = st.slider("Max Size", min_value=min_size, max_value=10, value=3)

    stack_eks_yaml = {
        "name": "cluster",
        "template": "https://github.com/shalb/cdev-aws-eks?ref=main",
        "kind": "Stack",
        "backend": "aws-backend",
        "cliVersion": ">= 0.7.14",
        "variables": {
            "region": project["variables"]["region"],
            "organization": project["variables"]["organization"],
            "cluster_name": cluster_name,
            "domain": domain,
            "eks_version": eks_version,
            "environment": "demo-env",
            "eks_managed_node_groups": {
                "workers": {
                    "capacity_type": "SPOT",
                    "desired_size": 2,
                    "disk_size": 80,
                    "force_update_version": True,
                    "instance_types": instance_types,
                    "labels": {},
                    "max_size": max_size,
                    "min_size": min_size,
                    "name": "spot-workers",
                    "subnet_ids": '{{ remoteState "cluster.vpc.private_subnets" }}',
                    "taints": [],
                    "update_config": {
                        "max_unavailable": 1
                    },
                    "iam_role_additional_policies": {
                        "ebspolicy": "arn:aws:iam::aws:policy/service-role/AmazonEBSCSIDriverPolicy"
                    },
                }
            },
        }
    }
    eks_addons_list = [
        ("ArgoCD", True),
        ("NGINX", True),
        ("External Secrets", True),
        ("Cluster Autoscaler", True),
        ("AWS LB Controller", True),
        ("External DNS", True),
        ("Cert Manager", True),
        ("EFS", False),
        ("Cert Manager HTTP Issuers", False),
        ("Metrics Server", True),
        ("Reloader", True)
    ]

    selected_addons = st.multiselect(
        "Select EKS Addons",
        options=[name for name, _ in eks_addons_list],
        default=[name for name, state in eks_addons_list if state]
    )
    eks_addons = {f"enable_{name.lower().replace(' ', '_')}": (name in selected_addons) for name, _ in eks_addons_list}
    stack_eks_yaml["variables"]["eks_addons"] = eks_addons

    if not create_vpc:
        stack_eks_yaml["variables"].update(vpc_config)

    return yaml.dump(stack_eks_yaml)
To integrate this into an existing sample, simply add a similar function invocation as we have for project.yaml:
stack_eks_yaml_content = generate_stack_eks_yaml(project_yaml_content)
st.subheader("Stack EKS YAML")
st.code(stack_eks_yaml_content, language="yaml")
This is the resulting interface
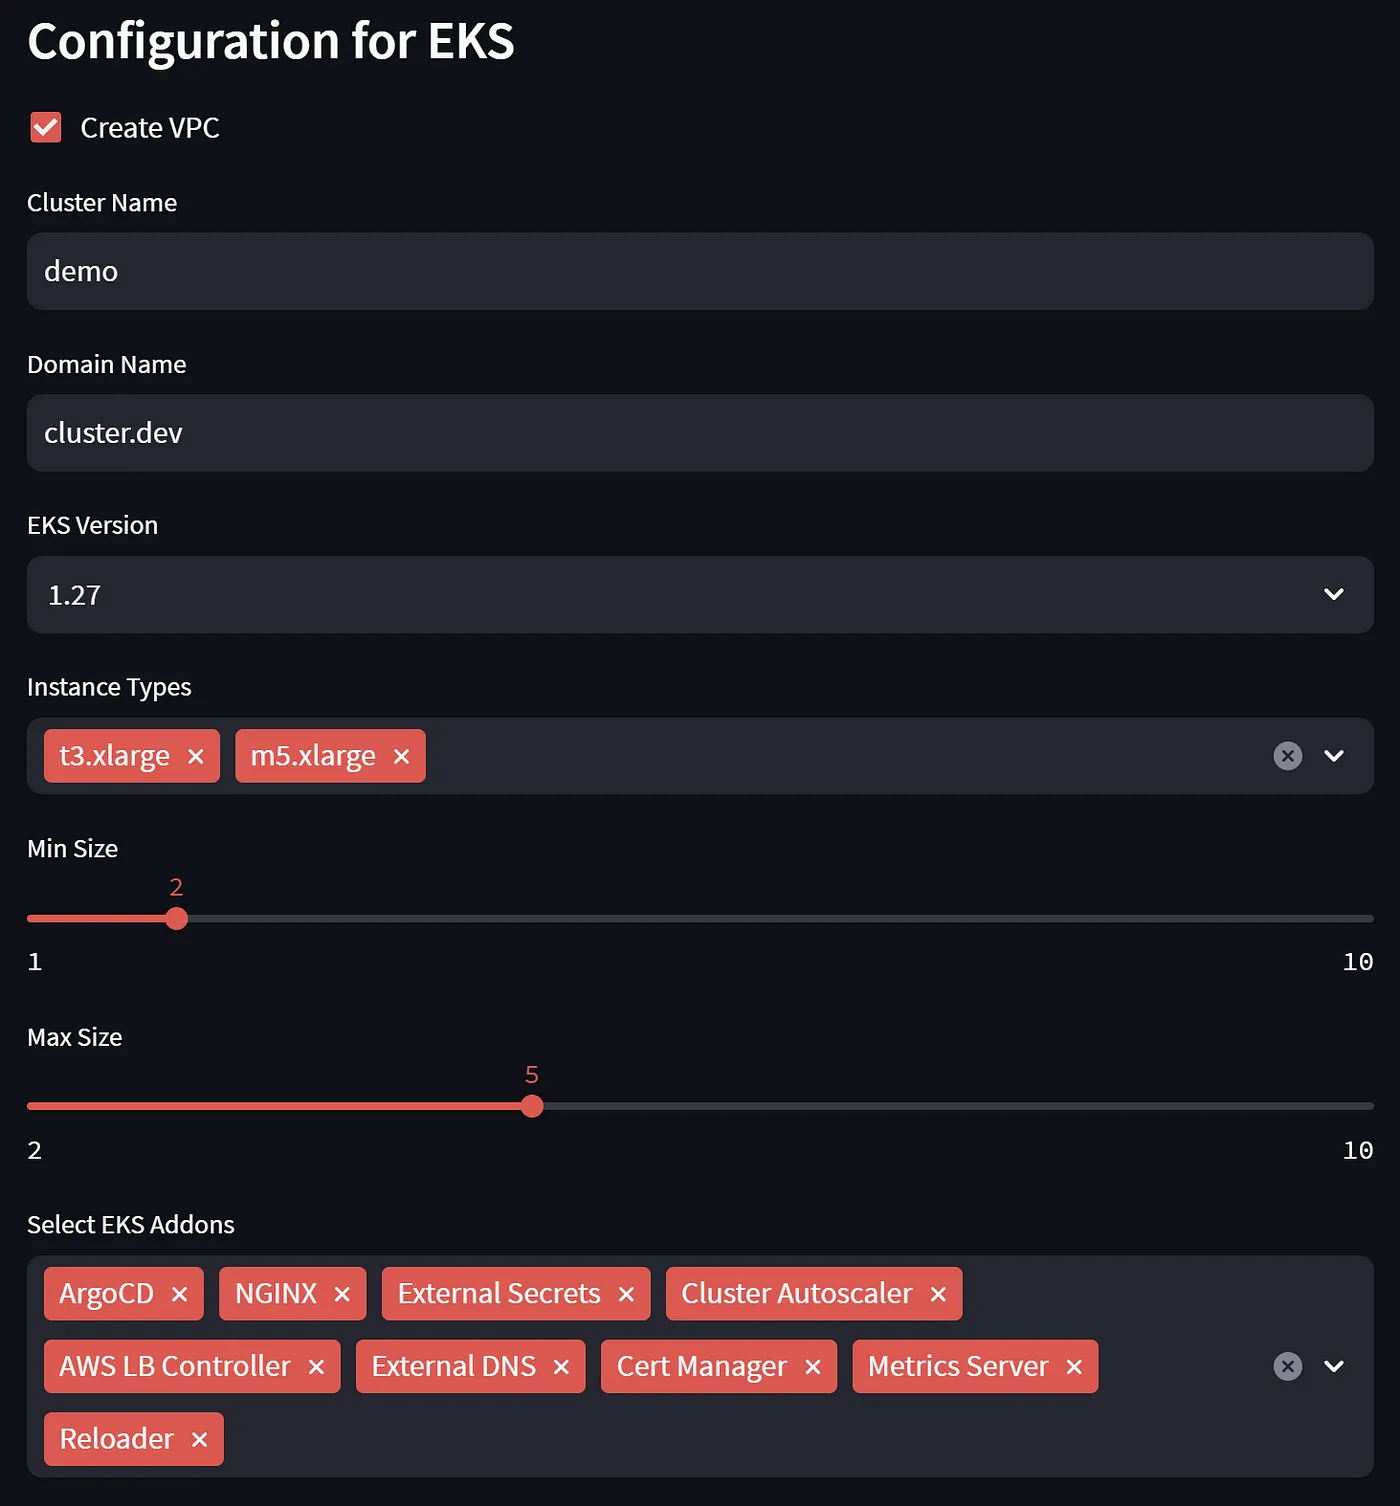
AWS EKS Cluster.dev Stack configuration
Summary
In this second article we have:
1. Discovered how to visualize code as a diagram using ChatGPT.
2. Launched our first Streamlit app.
3. Learned how to build UI for Cluster.dev with ChatGPT and Streamlit.
In the next part we will push our code to a GitHub repository and trigger GH Actions.
In the meantime, you can watch the ready-to-use EKS Cluster creation demo. And if you like digging into UI code, check it in the template repository.