Introduction
Deploying a production-ready K3s cluster on AWS demands efficiency, scalability, and robust infrastructure management. Leveraging Cluster.dev—a powerful toolset for Kubernetes infrastructure provisioning—we’ll explore how to seamlessly create and manage K3s clusters on Amazon Web Services (AWS). This article provides a comprehensive guide for setting up a single-node auto-scaling cluster using Cluster.dev on AWS.

Understanding Cluster.dev and AWS Integration
Cluster.dev simplifies Kubernetes cluster provisioning by automating infrastructure setup and configuration. Integrating seamlessly with AWS services, it streamlines the process of deploying, managing, and scaling Kubernetes clusters, allowing for efficient resource utilization and hassle-free operations.
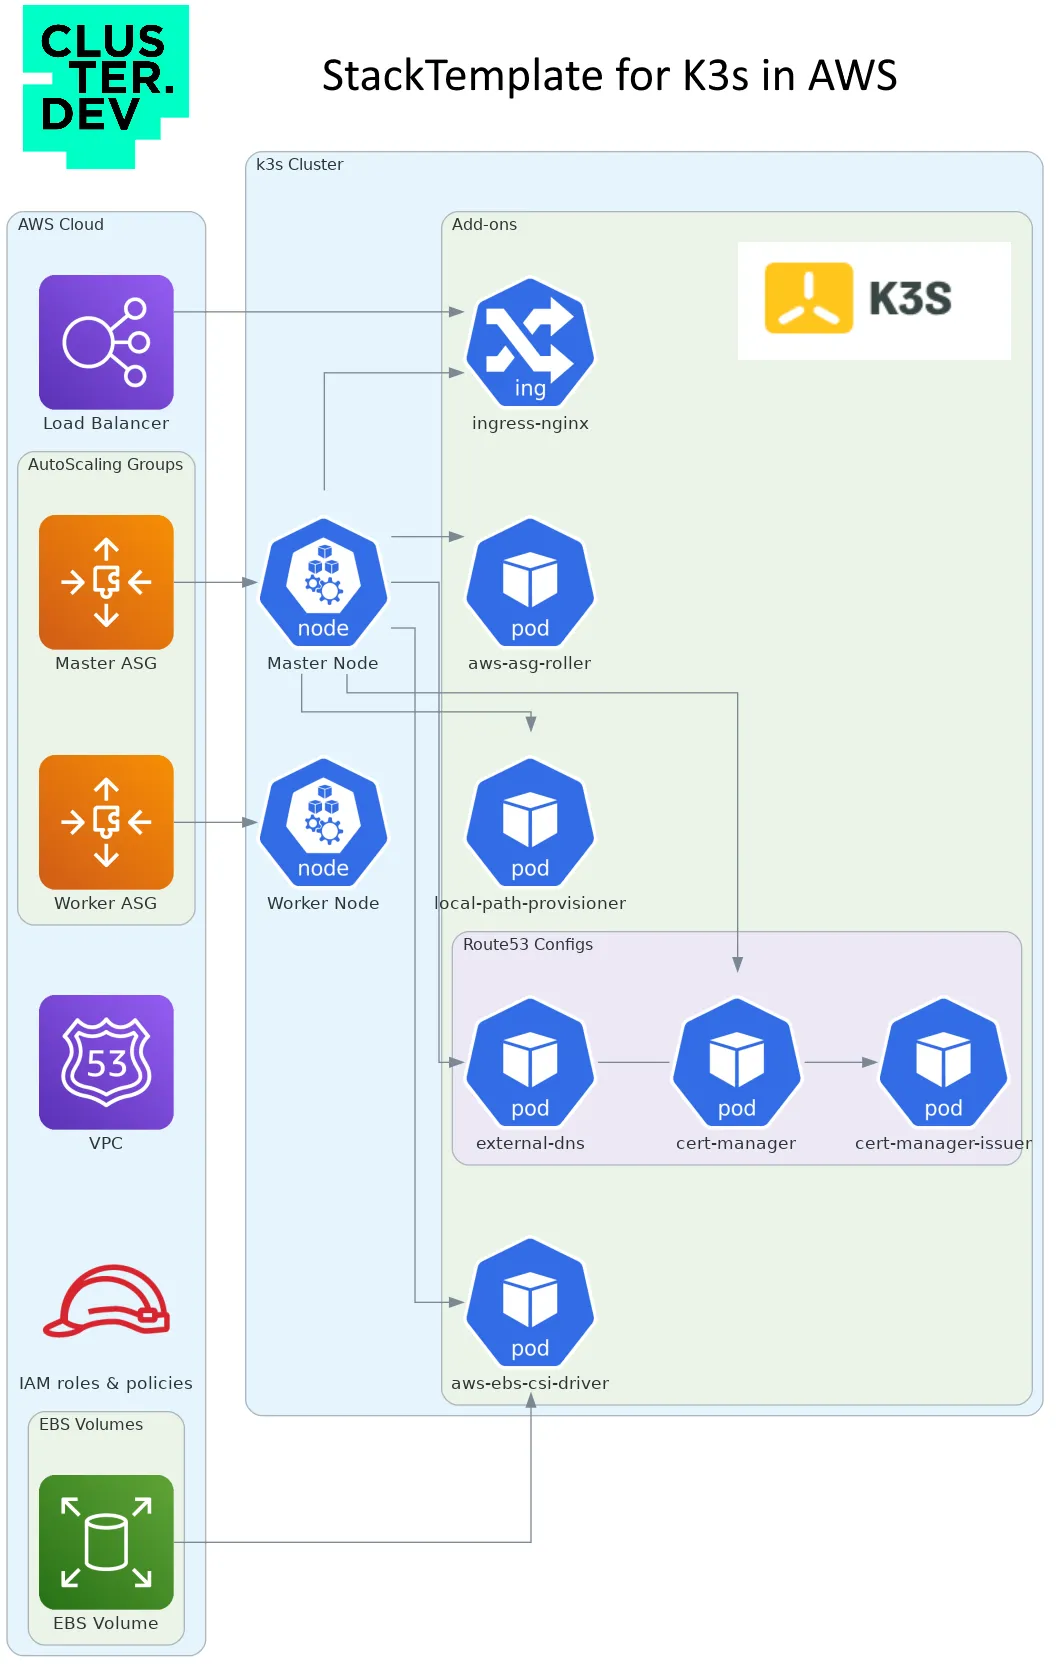
K3s cluster would be also configured with addons:
- aws-asg-roller — to manage auto-scaling groups updates.
- aws-ebs-csi-driver — to work with external persistent volumes.
- local-path-provisioner — to create volumes on the EC2 instances.
- ingress-nginx — to serve ingress objects instead of default traffic.
In case you have a DNS Zone (domain) configured in Route 53:
- external-dns — to manage zones from Ingress objects.
- cert-manager — to generate LetsEncrypt Certificates.
All required AWS resources like: VPC (you can define your own), Load Balancer, IAM roles and policies, Security Groups and others would be created.
What is K3s?
K3s is a lightweight distribution of Kubernetes designed for resource-constrained environments, edge computing, IoT devices, and situations where a full-featured Kubernetes cluster might be impractical or resource-intensive.
Developed by Rancher Labs, K3s aims to retain the essential functionalities of Kubernetes while being optimized for reduced memory usage and a smaller footprint.
K3s is not intended to replace standard Kubernetes clusters in all situations. Instead, it serves as a more lightweight alternative in scenarios where resource constraints or operational considerations require a more streamlined Kubernetes distribution.
What is Cluster.dev?
Cluster.dev is a platform designed to simplify the deployment and management of Kubernetes clusters. It provides tools that aim to streamline the process of setting up, configuring, and maintaining Kubernetes infrastructure.
The platform offers features such as:
- Multi-cloud cluster provisioning: Simplified setup and creation of Kubernetes clusters across various cloud providers or on-premises environments.
- Kubernetes integration: Provides a quick and easy start with both managed Kubernetes services and distributions.
- Automation: Integration with automation tools or workflows to streamline tasks like deployment, updates, and maintenance of applications running on Kubernetes.
- Modular architecture: Utilize ready-to-use modules to accomplish routine tasks such as deployment of static websites or configuring monitoring stack with Prometheus.
- Cost optimization: Insights or tools to help optimize resource allocation and costs associated with running Kubernetes clusters.
Setting up a Single-Node K3s Cluster on AWS with Cluster.dev – Overview
- Prerequisites: Ensure you have an AWS account with necessary permissions and credentials set up for Cluster.dev.
- Configuration: Use Cluster.dev’s configuration files to specify the required AWS settings, such as regions, instance types, and network configurations for the single-node K3s cluster.
- Deployment: Utilize Cluster.dev’s commands to initiate the deployment process, automatically provisioning the AWS resources and configuring K3s on a single node.
- Validation: Verify the successful creation of the K3s cluster by accessing its components, deploying sample applications, and performing tests to ensure functionality.
Prerequisites in detail
Detailed information regarding the configuration of prerequisites and the cloud account can be found here: documentation.
- Terraform version 1.4+
- AWS account/AWS CLI installed and configured access.
- AWS S3 bucket for storing states.
- kubectl installed.
- Cluster.dev client installed.
- (Optional) DNS zone in AWS account.
Project configuration in detail
Create a project directory locally, cd into it and execute the command:
[~/tmpk3s]$ cdev project create https://github.com/shalb/cdev-aws-k3s
09:33:22 [INFO] Creating: kuard.yaml
09:33:22 [INFO] Creating: kuard.yaml
09:33:22 [INFO] Creating: backend.yaml
09:33:22 [INFO] Creating: demo-app.yaml
09:33:22 [INFO] Creating: demo-infra.yaml  # Stack describing infrastructure
09:33:22 [INFO] Creating: project.yaml
This will create a new project.
Edit variables in the example’s files:
project.yaml — main project config. Sets common global variables for the current project such as organization, region, state bucket name etc.
backend.yaml — configures backend for Cluster.dev states (including Terraform states). Uses variables from project.yaml. See backend docs.
demo-infra.yaml — describes K3s stack configuration.
In addition, there would be a sample-application-template and demo-app.yaml files describing an example on deployment of Kubernetes sample application.
Let’s look at the sample of demo-infra.yaml:
name: k3s-demo
template: https://github.com/shalb/cdev-aws-k3s?ref=main
kind: Stack
backend: aws-backend
variables:
  cluster_name: cdev-k3s-demo
  bucket: {{ .project.variables.state_bucket_name }}
  region: {{ .project.variables.region }}
  organization: {{ .project.variables.organization }}
  domain: {{ .project.variables.domain }}
  instance_type: "t3.medium"
  k3s_version: "v1.28.2+k3s1"
  env: "demo"
  public_key: "ssh-rsa 3mnUUoUrclNkr demo" # Change this.
  public_key_name: demo
  master_node_count: 1
  worker_node_groups:
    - name: "node_pool"
      min_size: 2
      max_size: 3
      instance_type: "t3.medium"
The location of StackTemplate is defined on GitHub with a tag or branch pinned. You can also fork the StackTemplate or put it locally and edit it to include any addons required in your cluster (like ArgoCD/Flux, etc.)
In the Stack file you can set the DNS zone domain (if you have one in Route 53 account).
Set the version of K3s release.
Don’t forget to change a public key that would be deployed to nodes.
Finally, configure the required set of master and worker nodes sizing. This will create a dedicated EC2 Auto-scaling group for each node pool.
Deployment of K3s project
After the configuration of all required settings you can run cdev plan/apply commands to check and apply the whole stack in one shot.
[~/tmpk3s]$ cdev plan
Plan results:
+----------------------------------+
|         WILL BE DEPLOYED         |
+----------------------------------+
| k3s-demo.aws_key_pair            |
| k3s-demo.route53                 |
| k3s-demo.vpc                     |
| k3s-demo.iam-policy-external-dns |
| k3s-demo.k3s                     |
| k3s-demo.kubeconfig              |
| k3s-demo.ingress-nginx           |
| k3s-demo.external-dns            |
| k3s-demo.cert-manager            |
| k3s-demo.outputs                 |
| k3s-demo.cert-manager-issuer     |
| k3s-demo-app.kuard               |
+----------------------------------+
Here is the sample output for cdev apply:
[~/tmpk3s]$ cdev apply
10:03:52 [INFO] Applying unit 'k3s-demo.route53':
10:03:52 [INFO] Applying unit 'k3s-demo.iam-policy-external-dns':
10:03:52 [INFO] Applying unit 'k3s-demo.aws_key_pair':
10:03:52 [INFO] [k3s-demo][route53][init] In progress...
10:03:52 [INFO] [k3s-demo][route53][init] executing in progress... 0s
10:03:57 [INFO] [k3s-demo][route53][init] Success
10:03:57 [INFO] [k3s-demo][route53][apply] In progress...
...
10:04:22 [INFO] [k3s-demo][route53][apply] executing in progress... 25s
10:04:23 [INFO] [k3s-demo][iam-policy-external-dns][retrieving outputs] Success
10:04:23 [INFO] Applying unit 'k3s-demo.vpc':
10:04:23 [INFO] [k3s-demo][vpc][init] In progress...
10:04:23 [INFO] [k3s-demo][vpc][init] executing in progress... 0s
10:04:25 [INFO] [k3s-demo][aws_key_pair][apply] Success
...
10:04:30 [INFO] [k3s-demo][aws_key_pair][retrieving outputs] Success
10:04:30 [INFO] [k3s-demo][vpc][init] Success
10:04:30 [INFO] [k3s-demo][vpc][apply] In progress...
10:04:30 [INFO] [k3s-demo][vpc][apply] executing in progress... 0s
10:04:32 [INFO] [k3s-demo][route53][apply] executing in progress... 35s
Cluster.dev detects dependencies between units and builds an effective execution graph that applies Terraform, Helm and Kubernetes units in required order, passing values between units during execution.
After execution you will get outputs:
10:25:57 [INFO] Printer: 'k3s-demo.outputs', Output:
k3s_version = v1.28.2+k3s1
kubeconfig = /tmp/kubeconfig_cdev-k3s-demo
region = eu-central-1
cluster_name = cdev-k3s-demo
And you can use this kubeconfig and inspect your cluster:
[~/tmpk3s]$ export KUBECONFIG=/tmp/kubeconfig_cdev-k3s-demo
[~/tmpk3s]$ kubectl get nodes
NAME                                           STATUS   ROLES                       AGE   VERSION
ip-10-8-0-48.eu-central-1.compute.internal     Ready    <none>                      26m   v1.28.2+k3s1
ip-10-8-11-142.eu-central-1.compute.internal   Ready    control-plane,etcd,master   27m   v1.28.2+k3s1
ip-10-8-4-183.eu-central-1.compute.internal    Ready    <none>                      26m   v1.28.2+k3s1

[~/tmpk3s]$ kubectl get all -A
NAMESPACE       NAME                                            READY   STATUS    RESTARTS   AGE
cert-manager    pod/cert-manager-56b95dfb77-xn9xx               1/1     Running   0          59s
cert-manager    pod/cert-manager-cainjector-7f75fcc746-brk45    1/1     Running   0          59s
cert-manager    pod/cert-manager-webhook-7f9dc7f889-ccbbt       1/1     Running   0          59s
default         pod/kuard-deployment-5bb67b58b7-trprg           1/1     Running   0          30s
external-dns    pod/external-dns-5cdc5f687-5zbxw                1/1     Running   0          48s
ingress-nginx   pod/ingress-nginx-controller-86dbc68954-ld6rs   1/1     Running   0          63s
kube-system     pod/aws-asg-roller-6c95885f4-j54ws              1/1     Running   0          12m
kube-system     pod/aws-cloud-controller-manager-ztqm2          1/1     Running   0          12m
kube-system     pod/coredns-6799fbcd5-fztnn                     1/1     Running   0          13m
kube-system     pod/ebs-csi-controller-846b59c468-dxzn5         5/5     Running   0          12m
kube-system     pod/ebs-csi-node-5h7nw                          3/3     Running   0          12m
kube-system     pod/local-path-provisioner-84db5d44d9-bxb5k     1/1     Running   0          13m
kube-system     pod/metrics-server-67c658944b-qlpt7             1/1     Running   0          13m
To destroy K3s cluster and AWS resources you can use one command:
[~/tmpk3s]$ cdev destroy
Plan results:
+----------------------------------+
|        WILL BE DESTROYED         |
+----------------------------------+
| k3s-demo-app.kuard               |
| k3s-demo.external-dns            |
| k3s-demo.ingress-nginx           |
| k3s-demo.cert-manager-issuer     |
| k3s-demo.outputs                 |
| k3s-demo.cert-manager            |
| k3s-demo.kubeconfig              |
| k3s-demo.k3s                     |
| k3s-demo.iam-policy-external-dns |
| k3s-demo.vpc                     |
| k3s-demo.aws_key_pair            |
| k3s-demo.route53                 |
+----------------------------------+
Continue?(yes/no) [no]: yes
10:51:40 [INFO] Destroying...
10:51:40 [INFO] Destroying unit 'k3s-demo-app.kuard'
10:51:43 [INFO] [k3s-demo-app][kuard][init] In progress...
10:51:43 [INFO] [k3s-demo-app][kuard][init] executing in progress... 0s
10:51:45 [INFO] [k3s-demo-app][kuard][init] Success
10:51:45 [INFO] [k3s-demo][kubeconfig][init] In progress...
...
Best Practices for Managing K3s Clusters with Cluster.dev on AWS
Regular Maintenance and Updates: Stay updated with Cluster.dev releases and K3s updates, ensuring patches and upgrades are implemented promptly.
Cost Optimization: Optimize AWS resource usage by leveraging Cluster.dev’s capabilities for scaling resources based on demand and periodically reviewing instance types and configurations.
Security Measures: Implement AWS security best practices, configure network security groups, and regularly audit for potential vulnerabilities.
Summary
By harnessing the integration of Cluster.dev with AWS, deploying production-ready K3s clusters becomes an efficient and scalable process. Whether setting up a single-node cluster for testing purposes or a multi-node auto-scaling configuration for production workloads, Cluster.dev simplifies the complexity of Kubernetes infrastructure provisioning on AWS, enabling smooth operations and effective resource management.
As you embark on deploying K3s clusters, ensuring adherence to best practices and ongoing management is key to maintaining a robust and reliable Kubernetes environment on AWS.
 Schedule call


